Android性能优化之布局优化,主要介绍使用抽象布局标签(include, viewstub, merge)、合理编写Layout。
Android系统布局一般都是通过系统的API将XML解析为View,然后渲染视图界面上。解析XML和渲染视图需要花费时间,合理的编写布局文件将减少花费的时间。
1.介绍
- 使用< ViewStub />标签来加载一些不常用的布局;
- 将可复用的组件抽取出来并通过< include />标签使用;
- 使用< merge />标签减少布局的嵌套层次;
2.ViewStub的使用
开发应用程序的时候,经常会遇到这样的情况,会在运行时动态根据条件来决定显示哪个View或某个布局。
那么最通常的想法就是把可能用到的View都写在上面,先把它们的可见性都设为View.GONE,然后在代码中动态的更改它的可见性。
这样的做法的优点是逻辑简单而且控制起来比较灵活。但是它的缺点就是,耗费资源。
虽然把View的初始可见View.GONE但是在Inflate布局的时候View仍然会被Inflate,也就是说仍然会创建对象,会被实例化,会被设置属性。
也就是说,会耗费时间和内存等资源。(比如QQ在无网络状态下上方的提醒)
使用android.view.ViewStub,ViewStub是一个轻量级的View,它一个看不见的,不占布局位置,占用资源非常小的控件。
可以为ViewStub指定一个布局,在Inflate布局的时候,只有ViewStub会被初始化,然后当ViewStub被设置为可见的时候,或是调用了ViewStub.inflate()的时候,
ViewStub所向的布局就会被Inflate和实例化,然后ViewStub的布局属性都会传给它所指向的布局。这样,就可以使用ViewStub来方便的在运行时,要还是不要显示某个布局。
首先来说说ViewStub的一些特点:
(1)ViewStub只能Inflate一次,之后ViewStub对象会被置为空。按句话说,某个被ViewStub指定的布局被Inflate后,就不会够再通过ViewStub来控制它了,可以使用成员变量保存Inflate后View。
(2)ViewStub只能用来Inflate一个布局文件,而不是某个具体的View,当然也可以把View写在某个布局文件中。
下面是Activity的布局和ViewStub的布局viewstub_layout
1
2
3
4
5
6
7
8
9
10
11
12
13
14
| <?xml version="1.0" encoding="utf-8"?>
<RelativeLayout xmlns:android="http://schemas.android.com/apk/res/android"
xmlns:tools="http://schemas.android.com/tools"
android:layout_width="match_parent"
android:layout_height="match_parent"
tools:context=".MainActivity">
<ViewStub
android:id="@+id/view_stub"
android:layout_width="wrap_content"
android:layout_height="wrap_content"
android:layout="@layout/viewstub_layout"/>
</RelativeLayout>
|
1
2
3
4
5
6
7
8
9
10
| <?xml version="1.0" encoding="utf-8"?>
<RelativeLayout xmlns:android="http://schemas.android.com/apk/res/android"
android:layout_width="match_parent" android:layout_height="match_parent">
<TextView
android:layout_width="match_parent"
android:layout_height="wrap_content"
android:text="网络错误"/>
</RelativeLayout>
|
然后在MainActivity中使用和控制。
1
2
3
4
5
6
7
8
9
10
11
12
13
14
15
16
17
18
19
20
21
22
23
24
25
26
27
| public class MainActivity extends ActionBarActivity {
private View mNetErrorView;
@Override
protected void onCreate(Bundle savedInstanceState) {
super.onCreate(savedInstanceState);
setContentView(R.layout.activity_main);
}
private void onNetError() {
if (mNetErrorView != null) {
mNetErrorView.setVisibility(View.VISIBLE);
return;
}
ViewStub mViewStub = (ViewStub) findViewById(R.id.view_stub);
mNetErrorView = mViewStub.inflate();
mNetErrorView.setVisibility(View.VISIBLE);
}
private void onNetAvailable() {
if (mNetErrorView != null) {
mNetErrorView.setVisibility(View.GONE);
}
}
}
|
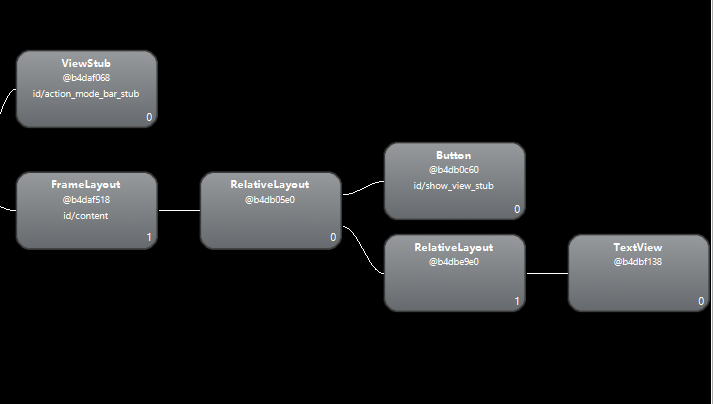
在mNetErrorView显示之前hierarchy viewer查看布局关系:

在mNetErrorView显示后hierarchy viewer查看布局关系:
3.include的使用
在实际开发中,有时候很多界面的某个模块的内容一样的时候,将相同模块放在一个XML布局文件中,通过使用include引用达到代码复用和易修改的效果。(比如带返回按钮的导航栏)
下面是布局文件的代码
1
2
3
4
5
6
7
8
9
10
| <?xml version="1.0" encoding="utf-8"?>
<LinearLayout xmlns:android="http://schemas.android.com/apk/res/android"
android:orientation="vertical" android:layout_width="match_parent"
android:layout_height="match_parent">
<include layout="@layout/include_layout"
android:layout_width="match_parent"
android:layout_height="wrap_content"/>
</LinearLayout>
|
下面是include_layout的代码
1
2
3
4
5
6
7
8
9
10
11
12
13
14
15
| <?xml version="1.0" encoding="utf-8"?>
<LinearLayout xmlns:android="http://schemas.android.com/apk/res/android"
android:orientation="vertical" android:layout_width="match_parent"
android:layout_height="match_parent">
<TextView
android:layout_width="wrap_content"
android:layout_height="wrap_content"
android:text="@string/app_name"/>
<Button
android:layout_width="wrap_content"
android:layout_height="wrap_content" />
</LinearLayout>
|
4.merge的使用
< merge />标签的作用是合并UI布局,使用该标签能降低UI布局的嵌套层次。
merge标签可用于两种典型情况:
a.布局顶结点是FrameLayout且不需要设置background或padding等属性,可以用merge代替,因为Activity内容试图的parent view就是个FrameLayout,所以可以用merge消除只剩一个。
b.某布局作为子布局被其他布局include时,且父布局的的布局类型和子布局的类型相同(比如父布局是RelativeLayout,include的布局也是RelativeLayout),使用merge当作该布局的顶节点,这样在被引入时顶结点会自动被忽略,而将其子节点全部合并到主布局中。
c.这种情况和b类似,使用的是ViewStub引入其他布局。
4.1 a种情景
Activity ContentView的 Layout的顶节点是FrameLayout。Activity的setContentView其实是将view添加到一个FrameLayout的父布局中。
1
2
3
4
5
6
7
8
9
10
11
| <?xml version="1.0" encoding="utf-8"?>
<FrameLayout xmlns:android="http://schemas.android.com/apk/res/android"
android:orientation="vertical" android:layout_width="match_parent"
android:layout_height="match_parent">
<TextView
android:layout_width="wrap_content"
android:layout_height="wrap_content"
android:text="@string/app_name"/>
</FrameLayout>
|
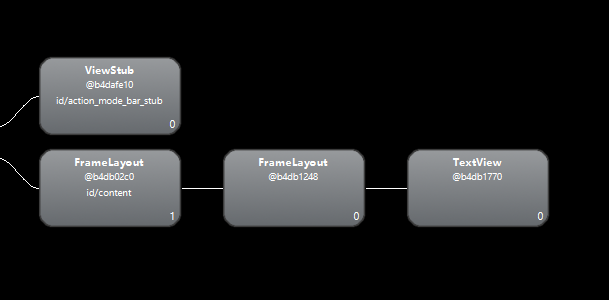
使用hierarchy viewer查看布局关系:
将布局改为下面的代码
1
2
3
4
5
6
7
8
9
10
11
| <?xml version="1.0" encoding="utf-8"?>
<merge xmlns:android="http://schemas.android.com/apk/res/android"
android:orientation="vertical" android:layout_width="match_parent"
android:layout_height="match_parent">
<TextView
android:layout_width="wrap_content"
android:layout_height="wrap_content"
android:text="@string/app_name"/>
</merge>
|
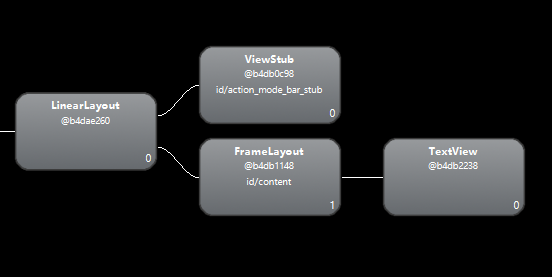
使用hierarchy viewer查看布局关系:
4.2 b种情景
Activity的布局文件如下:
1
2
3
4
5
6
7
8
9
10
11
12
13
14
15
16
17
| <?xml version="1.0" encoding="utf-8"?>
<RelativeLayout xmlns:android="http://schemas.android.com/apk/res/android"
android:orientation="vertical" android:layout_width="match_parent"
android:layout_height="match_parent">
<TextView
android:layout_width="wrap_content"
android:layout_height="wrap_content"
android:text="@string/app_name"
android:id="@+id/tv"/>
<include layout="@layout/include_layout"
android:layout_below="@id/tv"
android:layout_width="match_parent"
android:layout_height="match_parent"/>
</RelativeLayout>
|
include_layout 的布局文件如下:
1
2
3
4
5
6
7
8
9
10
11
12
13
14
15
| <?xml version="1.0" encoding="utf-8"?>
<RelativeLayout xmlns:android="http://schemas.android.com/apk/res/android"
android:orientation="vertical" android:layout_width="match_parent"
android:layout_height="match_parent">
<TextView
android:layout_width="wrap_content"
android:layout_height="wrap_content"
android:text="@string/app_name"/>
<Button
android:layout_width="wrap_content"
android:layout_height="wrap_content" />
</RelativeLayout>
|
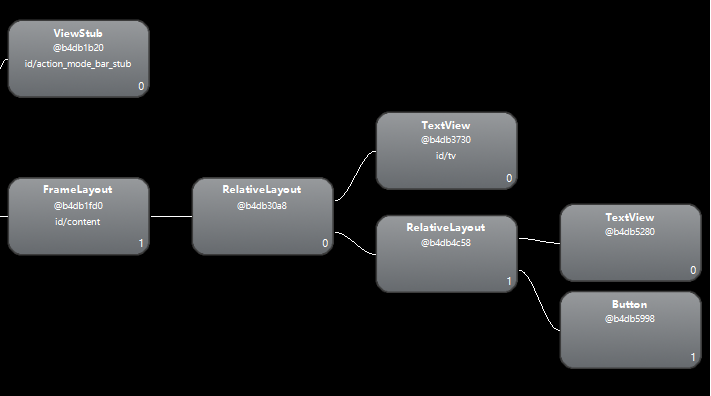
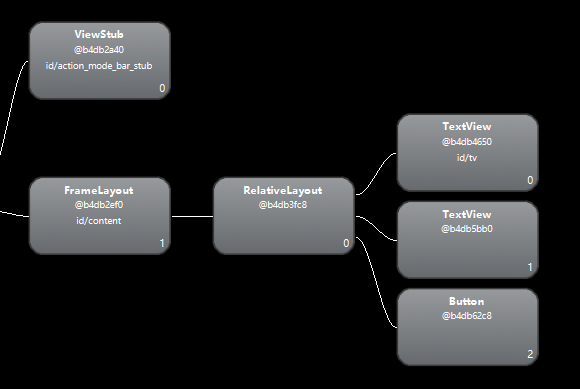
使用hierarchy viewer查看布局关系:
include_layout 修改后的布局文件如下:
1
2
3
4
5
6
7
8
9
10
11
12
13
14
15
| <?xml version="1.0" encoding="utf-8"?>
<merge xmlns:android="http://schemas.android.com/apk/res/android"
android:orientation="vertical" android:layout_width="match_parent"
android:layout_height="match_parent">
<TextView
android:layout_width="wrap_content"
android:layout_height="wrap_content"
android:text="@string/app_name"/>
<Button
android:layout_width="wrap_content"
android:layout_height="wrap_content" />
</merge>
|
使用hierarchy viewer查看布局关系:
4.3 c种情景和b类似,不作概述